# IT
# Apache
# Reverse proxy
Some apache modules have to be enabled:
```shell
sudo a2enmod ssl
sudo a2enmod proxy
sudo a2enmod proxy_balancer
sudo a2enmod proxy_http
```
Virtual hosts files have to be configured
```shell
ProxyPreserveHost On
ProxyPass "/" "http://192.168.111.2/"
ProxyPassReverse "/" "http://192.168.111.2/"
ServerName hostname.example.com
```
# Basic authentication
To protect some directory with basic authentication we have to edit the virtual host file and add some configurations like this:
```shell
AuthType Basic
AuthName "Authentication Required"
AuthUserFile "/home/someuser/.htpasswd"
Require valid-user
```
Then we have to create the user credentials file (AuthUserFile) with ***htpasswd*** command, in this example we will be using the file "/home/someuser/.htpasswd"
Using bcrypt
```shell
htpasswd -nbB USERNAME PASSWORD
```
Using MD5
```shell
htpasswd -nbm USERNAME PASSWORD
```
Using SHA1
```shell
htpasswd -nbs USERNAME PASSWORD
```
Using CRYPT
```shell
htpasswd -nbd USERNAME PASSWORD
```
[https://wiki.apache.org/httpd/PasswordBasicAuth](https://wiki.apache.org/httpd/PasswordBasicAuth "https://wiki.apache.org/httpd/PasswordBasicAuth")
[https://www.digitalocean.com/community/tutorials/how-to-set-up-password-authentication-with-apache-on-ubuntu-14-04](https://www.digitalocean.com/community/tutorials/how-to-set-up-password-authentication-with-apache-on-ubuntu-14-04 "https://www.digitalocean.com/community/tutorials/how-to-set-up-password-authentication-with-apache-on-ubuntu-14-04")
[https://httpd.apache.org/docs/2.4/misc/password\_encryptions.html](https://httpd.apache.org/docs/2.4/misc/password_encryptions.html "https://httpd.apache.org/docs/2.4/misc/password_encryptions.html")
# HTTPS (SSL)
add-apt-repository ppa:certbot/certbot
apt install python-certbot-apache
certbot --apache -d your\_domain -d www.your\_domain
[https://www.digitalocean.com/community/tutorials/how-to-secure-apache-with-let-s-encrypt-on-ubuntu-18-04-pt](https://www.digitalocean.com/community/tutorials/how-to-secure-apache-with-let-s-encrypt-on-ubuntu-18-04-pt)
Adding subdomain to existing certificate:
```shell
root@web2:/etc/letsencrypt# service apache2 stop
root@web2:/etc/letsencrypt# letsencrypt certonly --cert-name diogogl.com -d diogogl.com -d bank.diogogl.com -d gilberto.diogogl.com -d gilbertoadmin.diogogl.com -d gilbertomag.diogogl.com -d gilbertomagdev.diogogl.com -d gilbertotemplate.diogogl.com -d git.diogogl.com -d home.diogogl.com
Saving debug log to /var/log/letsencrypt/letsencrypt.log
How would you like to authenticate with the ACME CA?
- - - - - - - - - - - - - - - - - - - - - - - - - - - - - - - - - - - - - - - -
1: Apache Web Server plugin (apache)
2: Spin up a temporary webserver (standalone)
3: Place files in webroot directory (webroot)
- - - - - - - - - - - - - - - - - - - - - - - - - - - - - - - - - - - - - - - -
Select the appropriate number [1-3] then [enter] (press 'c' to cancel): 2
Plugins selected: Authenticator standalone, Installer None
- - - - - - - - - - - - - - - - - - - - - - - - - - - - - - - - - - - - - - - -
You are updating certificate diogogl.com to include new domain(s):
+ diogogl.com
+ gilberto.diogogl.com
+ gilbertoadmin.diogogl.com
+ gilbertomag.diogogl.com
+ gilbertomagdev.diogogl.com
+ gilbertotemplate.diogogl.com
+ git.diogogl.com
+ home.diogogl.com
You are also removing previously included domain(s):
(None)
Did you intend to make this change?
- - - - - - - - - - - - - - - - - - - - - - - - - - - - - - - - - - - - - - - -
(U)pdate cert/(C)ancel: u
Renewing an existing certificate
IMPORTANT NOTES:
- Congratulations! Your certificate and chain have been saved at:
/etc/letsencrypt/live/diogogl.com/fullchain.pem
Your key file has been saved at:
/etc/letsencrypt/live/diogogl.com/privkey.pem
Your cert will expire on 2024-02-21. To obtain a new or tweaked
version of this certificate in the future, simply run certbot
again. To non-interactively renew *all* of your certificates, run
"certbot renew"
- If you like Certbot, please consider supporting our work by:
Donating to ISRG / Let's Encrypt: https://letsencrypt.org/donate
Donating to EFF: https://eff.org/donate-le
root@web2:/etc/letsencrypt# service apache2 restart
root@web2:/etc/letsencrypt#
```
# Git
[http://rogerdudler.github.io/git-guide/](http://rogerdudler.github.io/git-guide/)
**Approve user and set it admin via gitlab-rails**
```shell
root@vps02:~# gitlab-rails console -e production
--------------------------------------------------------------------------------
Ruby: ruby 3.2.5 (2024-07-26 revision 31d0f1a2e7) [x86_64-linux]
GitLab: 17.6.0 (746f630acb1) FOSS
GitLab Shell: 14.39.0
PostgreSQL: 14.11
-----------------------------------------------------------[ booted in 811.12s ]
Loading production environment (Rails 7.0.8.4)
irb(main):001:0> user = User.find(1)
=> #
irb(main):002:0> user.attributes
=>
{"projects_limit"=>100000,
"id"=>1,
"admin"=>true,
"email"=>"diogo.goncalo@gmail.com",
"name"=>"Diogo Lourenço",
"username"=>"diogogl",
"avatar"=>nil,
"user_type"=>"human",
"encrypted_password"="..."
.
.
.
irb(main):003:0> user.admin = true
=> true
irb(main):004:0> user.state="active"
=> "active"
irb(main):005:0> user.save!
=> true
```
# Linux Administration
# Users and groups
**Adding an existing user to an existing group**
```shell
usermod -a -G theExampleGroup theExampleUser
```
**Changing the primary group of an existing user**
```shell
usermod -g theExampleGroup theExampleUser
```
**See wich groups the user belongs to**
```shell
groups theExampleUser
```
**Add an existing user to the sudo group**
```shell
usermod -aG sudo username
```
**Add a new user with name, shell and home directory**
```shell
sudo useradd -m -c "Samwise the Brave" sam -s /bin/bash
```
[https://www.cyberciti.biz/faq/howto-linux-add-user-to-group/](https://www.cyberciti.biz/faq/howto-linux-add-user-to-group/)
[https://www.digitalocean.com/community/tutorials/how-to-create-a-sudo-user-on-ubuntu-quickstart](https://www.digitalocean.com/community/tutorials/how-to-create-a-sudo-user-on-ubuntu-quickstart)
[https://askubuntu.com/questions/643411/ubuntu-14-04-new-user-created-from-command-line-has-missing-features](https://askubuntu.com/questions/643411/ubuntu-14-04-new-user-created-from-command-line-has-missing-features)
# Passwords
Use pwgen to generate ramdom passwords
pwgen will generate easy to remember passwords
```shell
# pwgen
Vi6yoo9K loisae4A Eeboo9Ci phahc9Ba Eic0teej Mithuij4 ahSah0oh Aiquao7t
Xai1mab1 sahx5veZ fai4Osah Hieg0Tai ohz0Ahth wa5ohLai Ol0ielah Phaeshi4
eemeKio8 AeNgei5i thohTh6u Ainoh0ae Engeir0w ool9teJ7 gaeFah3z ooJ0fieD
Ye8kaeNg YeeCha4D leiteCh6 Xi7lof3b Aen4dush eifue1Ui Ee3joosh Oe6ae0ei
Maibu7la Ief8uze3 jaeRoji6 yoxua5uL ooVae3eV Ungei2Ah vohWoh3i aiTh7noh
ahw0Vi2a Usaa0ooF eithe9Ph eiQueo4w Ex5aeghe eiVikuz6 aiV7Geix eiNgah1G
ai4Ookoo Aeteek8a IZo3ho3Z sohYoob4 Xaivohy0 mohV6ma2 Tho7ofai peeVoop2
cooBoo1o Vo4ivie8 ohve9Hah Oofoo7oo ahShu3eo pieree9O Eip6Luel kahl1ieW
Shoshei2 reeC2UPh aik4Shae Cohquif4 boh8iTeu iamu8Chu seuz2ieD ke2Aijut
Aequath7 ticieH9h athieGh1 ouB5eigo Saphe0ei iep3ieSh Pie1oowa Neix7yot
Okeequ8u vahng5Wa iedaiTe1 Iec6kahz Thu2gi9a saeNgo1k aigha3Th Ohghi3tu
Bohm9vie chueChu9 ESa9veu9 lahW8tha Ohpie2na we6Jaik7 ooG0oiP2 jae0Ooy6
eiThudo8 Chuud1Ph Ohyae2Th eiHoo5oH Tei3oobu cai0Quen Iej0Pahr gohThie3
oec4ooNu OD7ohFow eiGe7pah xahTai8E aethah9N Aeng6cei Hoh6jani Chiech1x
eiLah9Ri hee9doNg ooj9Aeth lu4Koh2k Yuzu0Cha jooxa8Ae AhFie8ie Nihe2wao
Oph5sieF eiMi8tus seeX8Oog Ien1imee uo7Xohn8 Kee0Aath Aigh0ahP eing6Ath
Aec6Oixu AhF9kipi Vai2ahMa eleeD3tu AelaiBa1 elie0Me1 JahTha9s Eitho9ko
Eec1sahs feixi7Wu sa3iB3qu Em4goxae el0Theik Eikeif0x Chee1xe9 CahS8thi
Aiweiy6Y iV0Vei5i OoJ4aeQu So2Baiph ve1Paepo big5oc6T Xa8pashu ieJoh1Ya
Aech6noh aiy3Zaeb eemai8IR Hei5aang aiz3Thah tho7fuNg ochoh5Ko sahk6aDi
```
with '-s' option, pwgen will generate completely random passwords
```shell
# pwgen -s
jtR8hxCL Bs0g0npf CppsPab4 zJ4S7uhd LfZQr9Ip f4eEIRbb Kt621WNi yh5KXh4p
88pAMDsH 9tYuCEbd DhxF948k pewAr9fc 3nWbKNP1 8j29MEf1 pw0XmT3k 2ccg4nqA
Znce74Gs LAMR4TZC ShC7QhF5 vGxwpg6l SiD1G2Gw feVyIzY4 aFZ2nFJw 1tgTOPlS
gj2M44VO PNK9BJJD pET0Q3Pn 06SbSqgP uVN2KHUu 96UIwCq3 DbYp25dy mibXb1u5
vZ1tplBW n0qoBkb0 7nKrGjHW Bbs78QuM BYV1ZNQM 2oj6YTUe Wyi6dbAo lCiZG3Rn
P39RDxDw i5RvRIi3 B5NQCDBx lAbdUc1j LmRW6OYc 23BITs0X 3eqz9OBh k0vQgYEj
o0uVjfme Uh9L5hmo 3Mfr3n7k E80gsBPV Bs0nX1hA zXCE0Fw4 M5rHGSWq VJK5Bs5a
8vCwTucw 5lytHncF S6UEhn5c VpOwlQt8 SBOS6VE0 uEpbs01C szKP5gNT lBJey27I
qI3ym27i ODEoz4DE EukP7kBq yX6jrrcS V8IN9DFV FBY3xrRX az7Re1mm iK254E4K
Bj5IOSnm owtDNU5H zf53TsJr kAoe0yL4 u06crJnW teGPK20e KOUY7MfT mP4V1Zz2
Id7DgpLV 9XN8kpHP NKH7msRm YM8IazE9 4YTOI1bg VkAnQl7O K3f5eOIf 09qS4qfJ
1d6jcBXl 73seQhP8 23BZsXUm bl5z7XFN 66qUxrA0 PrWP2IBz x6pZYdo5 F8z9mMS9
PT9uhGZr sGEO8hO2 M6AgxJku TsNbo4QO j7qdxwKa j7o4tasS nkkSLX2U v6OzVEGU
Kfh7zKsM NvB1x1VJ y02NP5rX xFgNEs4F cMZcoae7 uRBwME83 ZEigX30u pA8h0EHe
bs5mNjHh UY7a9l3U WEpt9BYX 6l9Yih3v 6VHae7QU nn2Hqrzy polQCe8g 1sOIA1wX
byZW6EEX ErB1TqLb uGVirfH2 7E6zoRMo Ru1TydTK M9Bop04R pmIF3ZDi X8gZsZkM
9cNm5frk bV266yam n5xLuvGT dUrINPA7 YzT3MQD6 BUJPh0cz Dt2D5kuv D4Se2smc
E09lZ0Ba MhpsER4d k2cSkw7D 4tFiARMY BSeiMKD1 7Sf1oFxe kq5EagRT 9OPfepnJ
BjiyU8PH C9kir7KO CPrHLq6e YjorH4FK YvjqOZ8u 9JZCcxrp a0UCqGIx 12bLTD5z
ZHgEV7Iy XrTlVP7r 0cl5rRLh 3XFZhB9k uNu5p3vP 3xY5GtMJ UZU19iV4 4mwLiFLJ
```
another useful option is to tell pwdgen the length and the number of password you want, this command will generate 21 password strings with 10 character of length each:
```shell
# pwgen -s 10 21
8ozwjX4zb9 1mNOblgkUM Miu9hFB9l5 OWPFmiHP3Q mPcTv0ngEM QGML7y7Ob8 w0wwDrY8Qo
ktjM4sjeFZ Pw6TyBABpV wmsxyaA0NK C60CV3P5UY sw5zzzn3I0 W78VvDpeQK 97GvzJpOy0
Mma8502oTY oIaUz5CL0B 4AX5BXJfaw S7btiGJm2K iqR83bBWvl KPRGGT5isc Pj8wAHtiuV
```
[https://linuxconfig.org/how-to-use-a-command-line-random-password-generator-pwgen-on-linux](https://linuxconfig.org/how-to-use-a-command-line-random-password-generator-pwgen-on-linux)
# SSH / SCP without known_hosts check
When we want to connect to a remote host using different credentials and we have automatic login with public key, we have to use some tweaks adding some parameters to scp, like this:
```shell
-o StrictHostKeyChecking=no -o UserKnownHostsFile=/dev/null
```
Example:
```shell
scp -o StrictHostKeyChecking=no -o UserKnownHostsFile=/dev/null root@10.5.0.154:/home/user/filename.ext .
```
# Ubuntu startup mode
**Show current default target**
```shell
sudo systemctl get-default
```
**To start in multi-user mode (text mode)**
```shell
sudo systemctl set-default multi-user.target
```
**To start in graphical mode (X mode)**
```shell
sudo systemctl set-default graphical.target
```
[https://askubuntu.com/questions/870221/booting-into-text-mode-in-16-04](https://askubuntu.com/questions/870221/booting-into-text-mode-in-16-04)
# Testing networking services
#### Netcat
Testing networking services to troubleshoot communications can be easily done with netcat like so:
```shell
nc -l -p 8000
```
Source: https://ubidots.com/blog/how-to-simulate-a-tcpudp-client-using-netcat/
# Services
**Managing services with systemctl**
**Start**
```shell
sudo systemctl start application.service
```
**Stop**
```shell
sudo systemctl stop application.service
```
**Status**
```shell
sudo systemctl status application.service
```
**Enabling service autostart on system boot**
```shell
sudo systemctl enable application.service
```
**Disabling service autostart on system boot**
```shell
sudo systemctl disable application.service
```
[https://www.digitalocean.com/community/tutorials/how-to-use-systemctl-to-manage-systemd-services-and-units](https://www.digitalocean.com/community/tutorials/how-to-use-systemctl-to-manage-systemd-services-and-units)
# Securely delete files and directories
#### Shred
```shell
shred -zvu -n 3 fileToDelete
```
#### Wipe
```shell
wipe -rfi privateDirectory/*
```
#### SRM (secure remove)
```shell
srm -vz privateDirectory/*
```
https://www.tecmint.com/permanently-and-securely-delete-files-directories-linux/
# rsync
[https://serverfault.com/questions/529287/rsync-creates-a-directory-with-the-same-name-inside-of-destination-directory](https://serverfault.com/questions/529287/rsync-creates-a-directory-with-the-same-name-inside-of-destination-directory)
# IPTables
### Allow All Incoming HTTP
- sudo iptables -A INPUT -p tcp --dport 80 -m conntrack --ctstate NEW,ESTABLISHED -j ACCEPT
- sudo iptables -A OUTPUT -p tcp --sport 80 -m conntrack --ctstate ESTABLISHED -j ACCEPT
link: https://www.digitalocean.com/community/tutorials/iptables-essentials-common-firewall-rules-and-commands
# Mounting ISO images under FreeBSD
[https://makandracards.com/jan0sch/13431-mounting-iso-images-under-freebsd](https://makandracards.com/jan0sch/13431-mounting-iso-images-under-freebsd)
# Console on serial port
### Example using RedHat Linux 6.0
#### Using lilo bootloader
##### Edit /etc/lilo.conf
```PROGRAMLISTING
append="console=tty0 console=ttyS0,9600n8"
```
```PROGRAMLISTING
boot=/dev/hda
map=/boot/map
install=/boot/boot.b
prompt
default=linux
# Changes for serial console on COM1: in global section
# Deleted: message=/boot/message
serial=0,9600n8
timeout=100
restricted
password=de7mGPe3i8
image=/boot/vmlinuz-2.4.2-2
label=linux
read-only
root=/dev/hda6
initrd=/boot/initrd-2.4.2-2.img
# Changes for serial console on COM1: in each image section
append="console=tty0 console=ttyS0,9600n8"
```
```SCREEN
bash# lilo
Added linux *
```
##### Edit /etc/inittab
```SCREEN
S0:12345:respawn:/sbin/mingetty ttyS0 9600 vt100
```
##### Adding the terminal to the secure list so that root can login
Needed in this particular case but avoid doing this because it is not a good practice regarding security
##### Edit /etc/securetty
```SCREEN
ttyS0
```
##### Links:
[https://tldp.org/HOWTO/Remote-Serial-Console-HOWTO/configure-kernel-lilo.html](https://tldp.org/HOWTO/Remote-Serial-Console-HOWTO/configure-kernel-lilo.html)
[https://www.kernel.org/doc/html/v4.15/admin-guide/serial-console.html](https://www.kernel.org/doc/html/v4.15/admin-guide/serial-console.html)
# Some useful commands
**Here is how to join two files side by side in columns, delimited by ";"**
```shell
paste file1 file2 -d ";"
```
# Ramdisk
Creating a ramdisk for fast read/write and comparing it with HDD/SSD drive using dd:
```bash
# Creating a directory to mount RAM disk
mkdir /mnt/ramdisk
# mounting ramdisk
sudo mount -t tmpfs -o size=1G tmpfs /mnt/ramdisk
# Dropping caches before testing for fair disk results
sudo sh -c 'echo 3 > /proc/sys/vm/drop_caches'
# Running write speed test on RAM disk
sudo dd if=/dev/zero of=/mnt/ramdisk/testfile bs=1M count=1024 conv=fdatasync status=progress
# Running write speed test on HDD/SSD disk
sudo dd if=/dev/zero of=/root/testfile bs=1M count=1024 conv=fdatasync status=progress
# Running read speed test on RAM disk
sudo dd if=/mnt/ramdisk/testfile of=/dev/null bs=1M status=progress
# Running read speed test on HDD/SSD disk
sudo dd if=/root/testfile of=/dev/null bs=1M status=progress
```
More information (IOPS, latency) using fio:
```bash
# Installing fio
sudo apt install fio
# Basic write test (both paths):
fio --name=write --directory=/mnt/ramdisk --size=1G --bs=1M --rw=write --direct=1 --numjobs=1
```
Cleaning up:
```bash
# Cleaning up
rm /mnt/ramdisk/testfile /root/testfile
# unmounting ramdisk
sudo umount /mnt/ramdisk
```
# Swap memory
[https://docs.vultr.com/how-to-add-swap-memory-in-ubuntu-24-04](https://docs.vultr.com/how-to-add-swap-memory-in-ubuntu-24-04)
# MacOS
# Aliases on shell
Since .bashrc is not working, i managed to do some tricks
Edit /etc/profile and add the following lines.......
# Dealing with ISO Files with hdiutil
**Creating an iso file from a directory**
```shell
hdiutil makehybrid -iso -joliet -o output_image.iso input_directory/
```
**Mounting an iso file into /Volumes/**
```shell
hdiutil mount source_image.iso
```
# Writing image to SD card
#### **These are the steps to write an raspberry pi OS image to an SD card on MacOS**
**1. Insert card on reader**
**Identify the disk number**
```shell
diskutil list
```
**2. Unmount the disk**
```shell
unmountDisk /dev/disk2
```
**3. Write the image**
```shell
sudo dd bs=1m if=hassos_rpi3-2.12.img of=/dev/rdisk2 conv=sync
```
**4. Eject card**
```shell
sudo diskutil eject /dev/rdisk2
```
**Done!**
[https://www.raspberrypi.org/documentation/installation/installing-images/mac.md](https://www.raspberrypi.org/documentation/installation/installing-images/mac.md)
# DNS Cache clear
dscacheutil -flushcache
sudo killall -HUP mDNSResponder
[https://www.siteground.com/kb/how\_to\_clear\_the\_local\_dns\_cache\_in\_mac\_os/](https://www.siteground.com/kb/how_to_clear_the_local_dns_cache_in_mac_os/)
# MySQL
# Linux auto-login on MySQL
Create file `~/.my.cnf` and add the following lines, replace mysqluser and mysqlpass values with the correct ones
```shell
[client]
user=mysqluser
password="mysqlpass"
```
For safety, make this file readable to you only by running `chmod 0600 ~/.my.cnf`` `
Next time you run mysql commands mysql, mysqlcheck, mysqdump, etc; they will pick username & password from this file if you do not provide them as argument (-u and -p). It can save your time.
Of-course, if you specify username and password explicitly as part of commands arguments, they will be used.
[https://easyengine.io/tutorials/mysql/mycnf-preference/](https://easyengine.io/tutorials/mysql/mycnf-preference/)
# Encoding and collation
Changing database encoding and collation
```SQL
ALTER DATABASE `sua_base` CHARSET = Latin1 COLLATE = latin1_swedish_ci;
```
[https://pt.stackoverflow.com/questions/72139/qual-codificação-de-caracteres-collation-devo-usar-em-mysql](https://pt.stackoverflow.com/questions/72139/qual-codifica%C3%A7%C3%A3o-de-caracteres-collation-devo-usar-em-mysql)
# Exporting data
To export structure only, use this option on mysqldump:
```SQL
mysqldump [...] --no-data
```
To export command result to csv file format:
```SQL
SELECT order_id,product_name,qty
FROM orders
WHERE foo = 'bar'
INTO OUTFILE '/var/lib/mysql-files/orders.csv'
FIELDS TERMINATED BY ','
ENCLOSED BY '"'
LINES TERMINATED BY '\n';
```
# Useful commands
### Show status
```lang-sql
show table status;
```
### Purging MySQL Binlog files
##### To show binary logs
```lang-sql
mysql> SHOW BINARY LOGS;
```
##### To Purge binary logs manually until some point
```lang-sql
mysql> PURGE BINARY LOGS TO 'binlog.000776';
```
##### To show binary logs
```lang-sql
mysql> SET GLOBAL binlog_expire_logs_seconds = 259200;
Query OK, 0 rows affected (0.00 sec)
mysql> SET PERSIST binlog_expire_logs_seconds = 259200;
Query OK, 0 rows affected (0.01 sec)
```
[https://askubuntu.com/questions/1322041/how-to-solve-increasing-size-of-mysql-binlog-files-problem](https://askubuntu.com/questions/1322041/how-to-solve-increasing-size-of-mysql-binlog-files-problem)
[https://dev.mysql.com/doc/refman/8.0/en/replication-options-binary-log.html](https://dev.mysql.com/doc/refman/8.0/en/replication-options-binary-log.html)
# Security
Iptables configuration to allow specific host connection to mysql:
```lang-sql
iptables -A INPUT -i eth0 -p tcp -m tcp --dport 3306 -s IP.ADD.RE.SS -j ACCEPT
```
# Virtualization
# Cloning existing machine on Vmware ESXI
[http://www.mustbegeek.com/create-copy-of-existing-virtual-machine-in-esxi-server/](http://www.mustbegeek.com/create-copy-of-existing-virtual-machine-in-esxi-server/)
# Notes
#### VDI /VHD Conversion
With virtualbox
[https://www.sysprobs.com/vdi-vhd-convert-virtualbox-virtual-machines-virtual-pc](https://www.sysprobs.com/vdi-vhd-convert-virtualbox-virtual-machines-virtual-pc)
# Mikrotik
# Cloning configuration
[https://jcutrer.com/howto/networking/mikrotik/perfectrestore-script](https://jcutrer.com/howto/networking/mikrotik/perfectrestore-script)
# Wireguard VPN setup
In this tutorial we will setup a VPN (Virtual Private Network). There are multiple types of VPN, in this tutorial we will focus on "remote access VPN" type. We will configure server and client and test the connection.
WireGuard uses ChaCha20 Encryption Algorithm, it works with shorter cryptographic keys than AES-256, allowing for faster encryption and decryption.
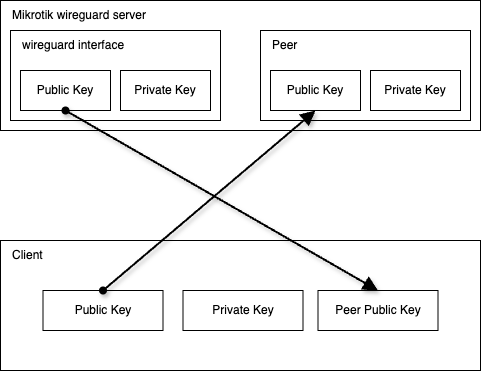
#### 1 - The following diagram shows what we will do in the next steps:
- copy the generated public key from the mikrotik wireguard interface to the client peer public key field
- copy the generated client public key to the mikrotik wireguard peer public key field
[](https://books.diogogl.com/uploads/images/gallery/2026-03/scaled-1680-/HETmkt-wireguard-drawio-png.png)
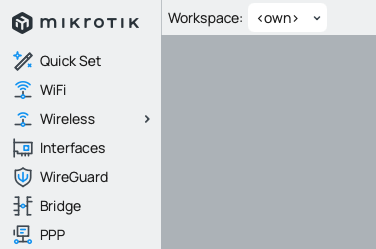
##### 1.1 - Lets begin... first we need to open the wireguard setup menu
[](https://books.diogogl.com/uploads/images/gallery/2026-03/scaled-1680-/q3Fwireguard1-png.png)
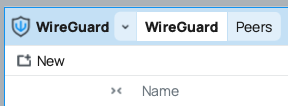
##### 1.2 - Create a new interface
[](https://books.diogogl.com/uploads/images/gallery/2026-03/scaled-1680-/Kezwireguard2-png.png)
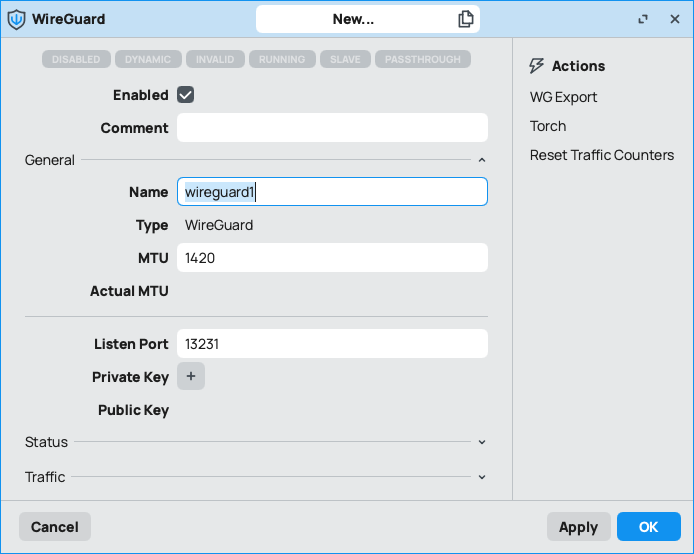
##### 1.3 - setup the following fields:
- name
- listen port
at the end hit apply and the key pair will be generated
[](https://books.diogogl.com/uploads/images/gallery/2026-03/scaled-1680-/4d1wireguard3-png.png)
##### 1.4 - here you can see the generated key pair
[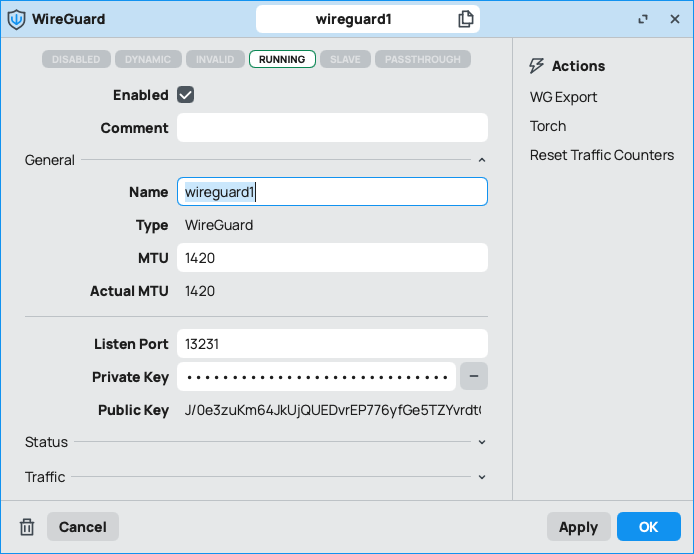](https://books.diogogl.com/uploads/images/gallery/2026-03/scaled-1680-/QJrwireguard4-png.png)
##### 1.5 - Next we need to setup the peers (clients) access
[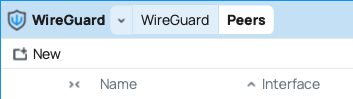](https://books.diogogl.com/uploads/images/gallery/2026-03/scaled-1680-/599wireguard5-png.png)
##### 1.6 - we need to set the following fields:
- comment (optional)
- name
- interface (created in step 1.3)
- private key auto
- allowed address 0.0.0.0/0 or ::/0 (default) to allow any, or define other
hit apply to set the peer configuration
[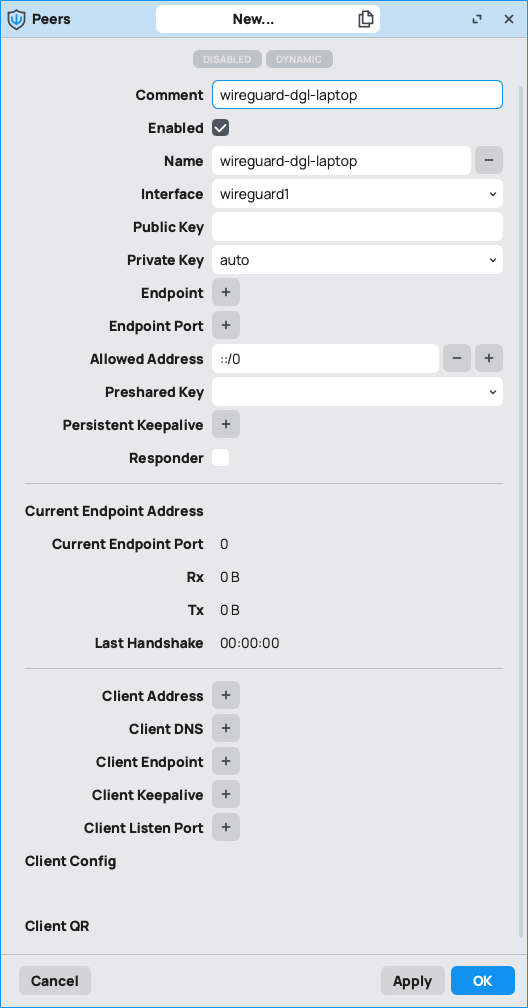](https://books.diogogl.com/uploads/images/gallery/2026-03/scaled-1680-/tVgwireguard6-png.png)
##### 1.7 - now we can see the generated key pairs
[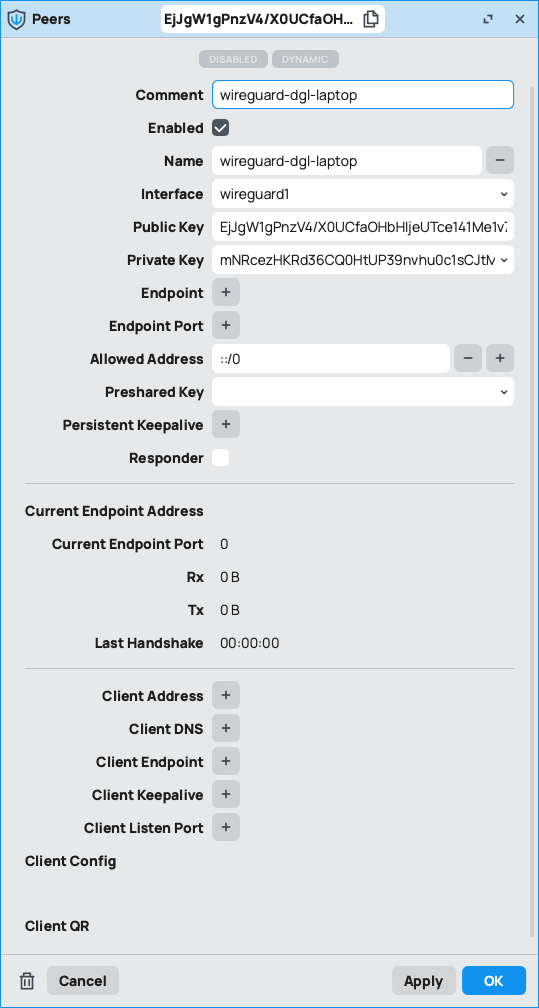](https://books.diogogl.com/uploads/images/gallery/2026-03/scaled-1680-/XTbwireguard7-png.png)
##### 2 - firewall setup
##### 2.1 - open ip firewall configuration
[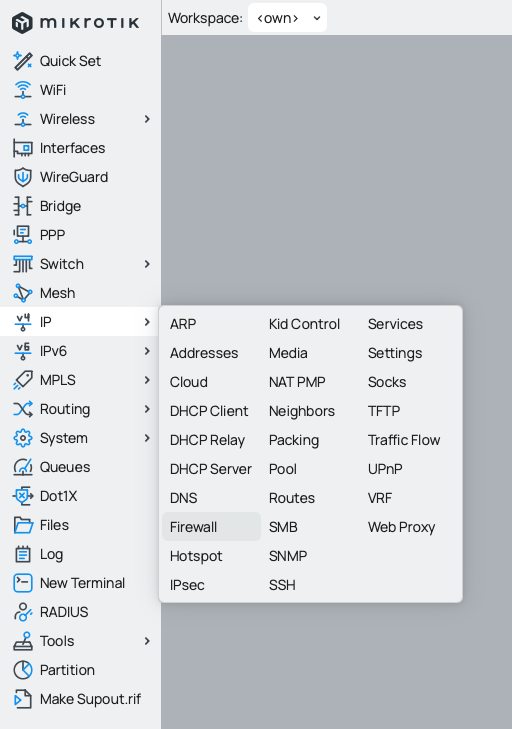](https://books.diogogl.com/uploads/images/gallery/2026-03/scaled-1680-/LgKwireguard-firewall-1-png.png)
##### 2.2 - we need to open the wireguard UDP port to allow VPN traffic, go to filter rules and create a new one
[](https://books.diogogl.com/uploads/images/gallery/2026-03/scaled-1680-/zY7wireguard-firewall-2-png.png)
##### 2.3 - the new filter rule need the following information:
- chain: input
- protocol: UDP
- dst. port: 13231
- action: accept
- comment (optional)
[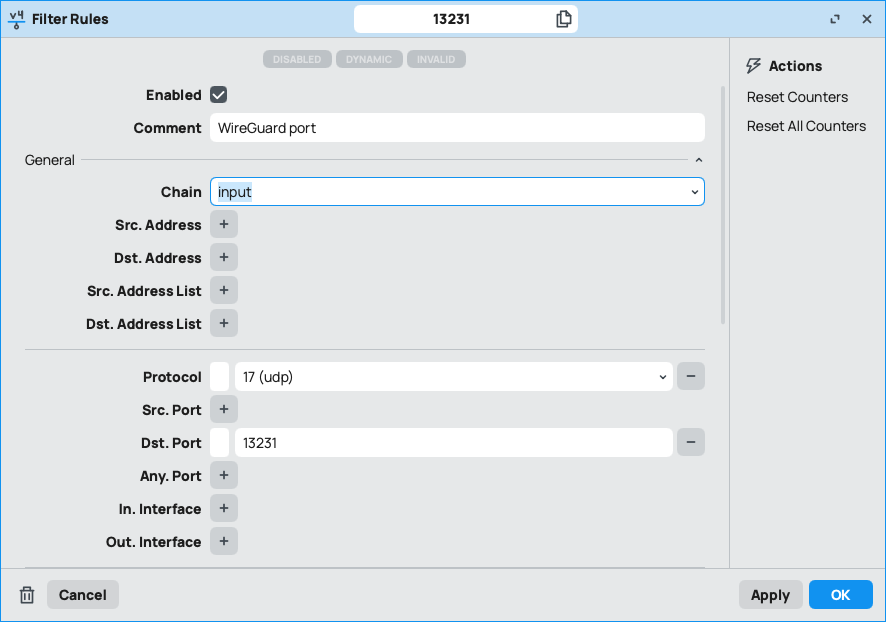](https://books.diogogl.com/uploads/images/gallery/2026-03/scaled-1680-/wWUwireguard-firewall-3-png.png)
hit apply and OK or just OK to save the rule
you can also set this rule by CLI:
/ip firewall filter
add action=accept chain=input comment="WireGuard port" dst-port=13231 protocol=udp
##### 2.4 - masquerade VPN traffic
go to firewall NAT settings
[](https://books.diogogl.com/uploads/images/gallery/2026-03/scaled-1680-/eBLwireguard-firewall-4-png.png)
and add a new rule with the following information:
- chain: srcnat
- src-address: 192.168.100.0/24
- action: masquerade
[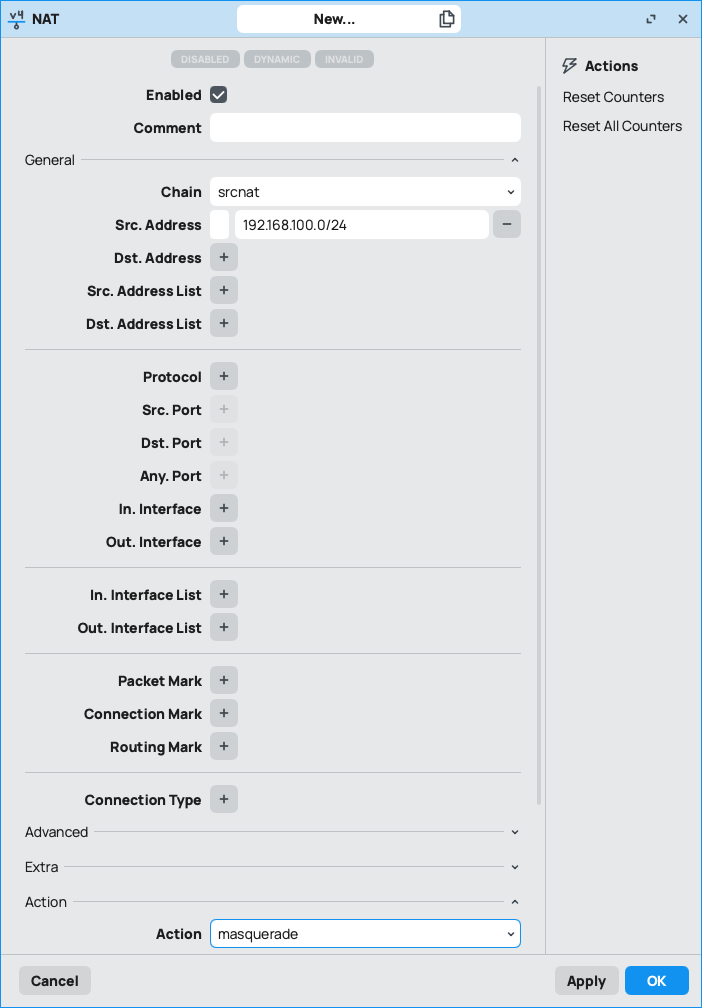](https://books.diogogl.com/uploads/images/gallery/2026-03/scaled-1680-/A6xwireguard-firewall-5-png.png)
you can also add this rule by CLI:
/ip firewall nat
add action=masquerade chain=srcnat src-address=192.168.100.0/24
##### 3 - dns setup
if you route all client traffic over the VPN, you might not have internet access, usually this is only a matter of DNS configuration
go to DNS configuration
[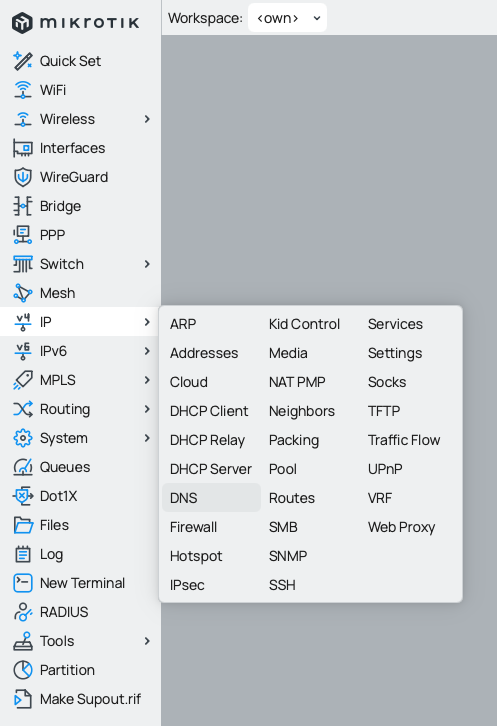](https://books.diogogl.com/uploads/images/gallery/2026-03/scaled-1680-/Otrwireguard-dns-1-png.png)
then allow remote requests on your mikrotik like this:
[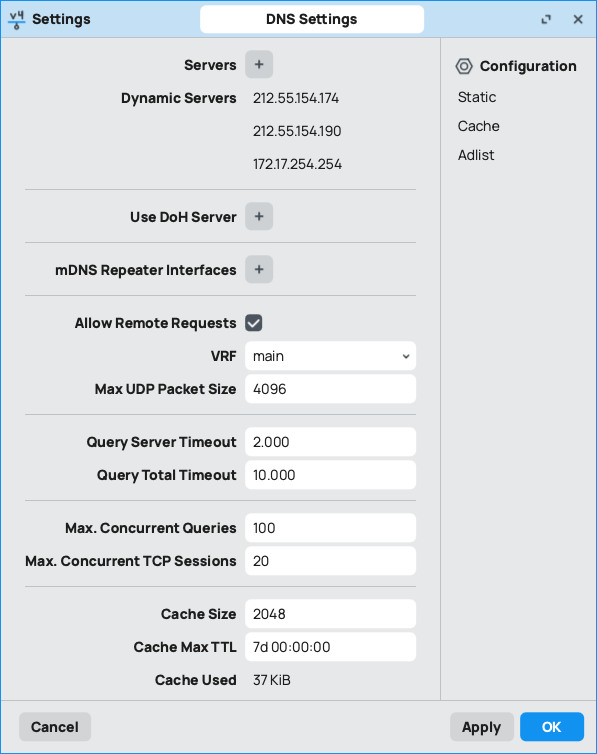](https://books.diogogl.com/uploads/images/gallery/2026-03/scaled-1680-/f2Hwireguard-dns-2-png.png)
##### 2 - Setup MacOS wireguard client
##### 2.1 - On wireguard icon, choose "manage tunnels":
[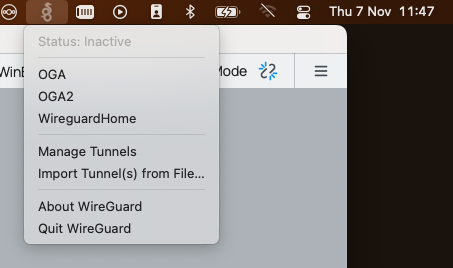](https://books.diogogl.com/uploads/images/gallery/2026-03/scaled-1680-/FRewireguard-mac-1-png.png)
##### 2.2 - set the following information:
- tunnel name
- address (set before on mikrotik)
- dns (usually the mikrotik wireguard interface address)
- peer public key (from wireguard interface public key info)
- allowed ips can set it to any (0.0.0.0/0) or define it to allow only your networks or hosts
- endpoint (is the public ip address or dns name of the wireguard server)
[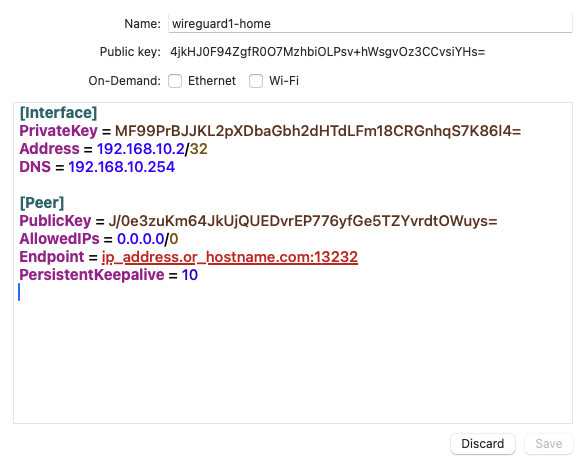](https://books.diogogl.com/uploads/images/gallery/2026-03/scaled-1680-/6Smwireguard-mac-2-png.png)
##### 2.3 - now you can hit the connection name to connect
[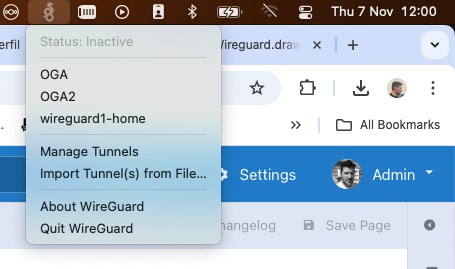](https://books.diogogl.com/uploads/images/gallery/2026-03/scaled-1680-/LqUwireguard-mac-3-png.png)
##### 2.4 - as you can see, the vpn connection has been alive for 47 seconds
[](https://books.diogogl.com/uploads/images/gallery/2026-03/scaled-1680-/ojJwireguard-mac-4-png.png)
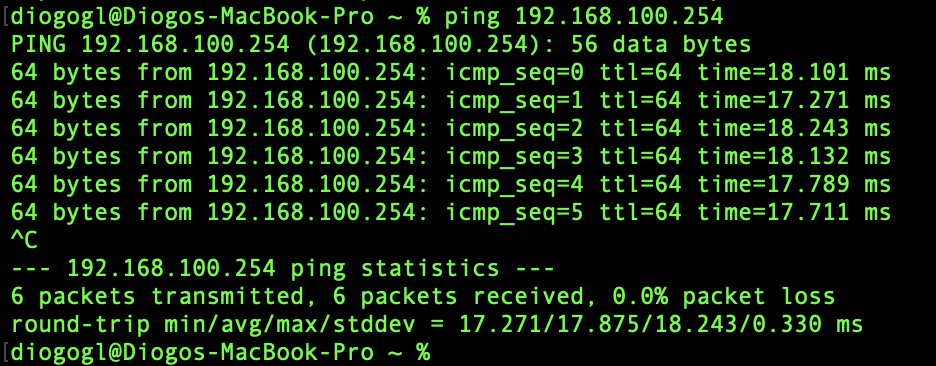
##### 3 - testing
##### 3.1 - ping test
One of the first tests you can do is to ping the server address 192.168.10.254, if successful, you can now ping other machines on your network
[](https://books.diogogl.com/uploads/images/gallery/2026-03/scaled-1680-/0s4wireguard-ping-1-png.png)
# Networking Administration
# Switching
#### 3Com
Choosing which firmware to boot
verifying current versions:
> show version
setting next-active to the backup (before update) one:
> boot system backup
setting next-active to the active (most recent) one:
> boot system active
Reset to defaults:
[https://www.vmadmin.co.uk/networking/81-hp-3com/358-reset-3com-switch-to-factory-defaults-forgot-password](https://www.vmadmin.co.uk/networking/81-hp-3com/358-reset-3com-switch-to-factory-defaults-forgot-password)
#### Cisco
ACLs
Adding ACL example
360 permit tcp any 10.3.4.102 0.0.0.0 eq 8000
Removing last ACL
no 360
Global features
Filtering output
"COMMAND | i" or "COMMAND | include" will filter command output
example:
"switch1#show running-config | i trunk"
"switch1#show running-config | include trunk"
# Trunk between Cisco and Linux
**Cisco configuration**
```shell
interface GigabitEthernet0/11
switchport trunk allowed vlan 200,231
switchport mode trunk
switchport voice vlan 280
spanning-tree portfast
end
```
**Kali Linux configuration**
/etc/networking/interfaces
```shell
interface GigabitEthernet0/11
switchport trunk allowed vlan 200,231
switchport mode trunk
switchport voice vlan 280
spanning-tree portfast
end
```
Kali Linux configuration
# Curiosities
# Curiosities
Off by one error (OBOE)
[https://en.wikipedia.org/wiki/Off-by-one\_error](https://en.wikipedia.org/wiki/Off-by-one_error)
Layer 8 Issues
[https://en.wikipedia.org/wiki/Layer\_8](https://en.wikipedia.org/wiki/Layer_8)
# Tools
# Tools
Download entire site with wget and authentication
$ wget --user=THE\_USERNAME --password=THE\_PASSWORD --recursive --no-parent https://SITE\_URL/
# Servers
# Flashing Dell PERC H710 mini to IT mode
https://fohdeesha.com/docs/perc/
# Web development
# Laravel
supervisor
[https://laravel.com/docs/5.4/queues#supervisor-configuration](https://laravel.com/docs/5.4/queues#supervisor-configuration)
Generate random string:
```lang-php
'#mySelect2').val('1'); $('#mySelect2').trigger('change');
[https://select2.org/programmatic-control/add-select-clear-items](https://select2.org/programmatic-control/add-select-clear-items)
# Windows Server
# Misc commands
...
# Docker
# Portainer
Servas bookmark manager
content of docker compose file:
```shell
version: "3"
services:
servas:
image: beromir/servas
container_name: servas
restart: unless-stopped
ports:
- "8082:80"
- "8083:443"
volumes:
- /home/diogogl/dockerApps/servas/.env:/app/.env
- /home/diogogl/dockerApps/servas/servas-db-sqlite:/app/database/database.sqlite
volumes:
servas-db-sqlite:
```
stack .env file content:
```shell
APP_NAME=Servas
APP_ENV=production
APP_KEY=base64:zzzzzzzzzzzzzzzzzzzzzzzzzzzzzzzzzzzzzzzzzzzzzzzzzzzz=
APP_DEBUG=false
APP_URL=https://home.diogogl.com:8083
SERVAS_ENABLE_REGISTRATION=true
SERVAS_SHOW_APP_VERSION=true
DB_CONNECTION=sqlite
DB_DATABASE=/app/database/database.sqlite
DB_FOREIGN_KEYS=true
```
# Pi-hole
```bash
services:
pihole:
container_name: pihole
image: pihole/pihole:latest
ports:
- "53:53/tcp"
- "53:53/udp"
- "8085:80/tcp"
- "7443:443/tcp"
dns:
- 8.8.8.8
- 1.1.1.1
environment:
TZ: 'Europe/Lisbon'
FTLCONF_webserver_api_password: 'mysecret'
PIHOLE_DNS_: 8.8.8.8;1.1.1.1
PIHOLE_UID: 1000
PIHOLE_GID: 1000
FTLCONF_dns_listeningMode: "ALL"
volumes:
- './etc-pihole:/etc/pihole'
- './etc-dnsmasq.d:/etc/dnsmasq.d'
cap_add:
- NET_ADMIN
```
# Microcontrollers and electronics
# Esp32 web bluetooth
[https://randomnerdtutorials.com/esp32-web-bluetooth/](https://randomnerdtutorials.com/esp32-web-bluetooth/)
[https://blog.balena.io/using-web-bluetooth-to-communicate-with-bluetooth-devices/](https://blog.balena.io/using-web-bluetooth-to-communicate-with-bluetooth-devices/)
[https://notificare.com/blog/2021/09/24/Quick-peek-into-the-Web-Bluetooth-API/](https://notificare.com/blog/2021/09/24/Quick-peek-into-the-Web-Bluetooth-API/)
# ESP32 with POE
https://mauser.pt/095-5973/lilygo-ttgo-t-internet-poe-downloader-placa-de-desenvolvimento-esp32-com-ethernet-e-poe-modulo-programador
# GNSS / GPS
# RTK
[https://www.ardusimple.com/product/wifi-ntrip-master/](https://www.ardusimple.com/product/wifi-ntrip-master/)
# History of time synchronization
# NTP
# GPS / GNSS and time